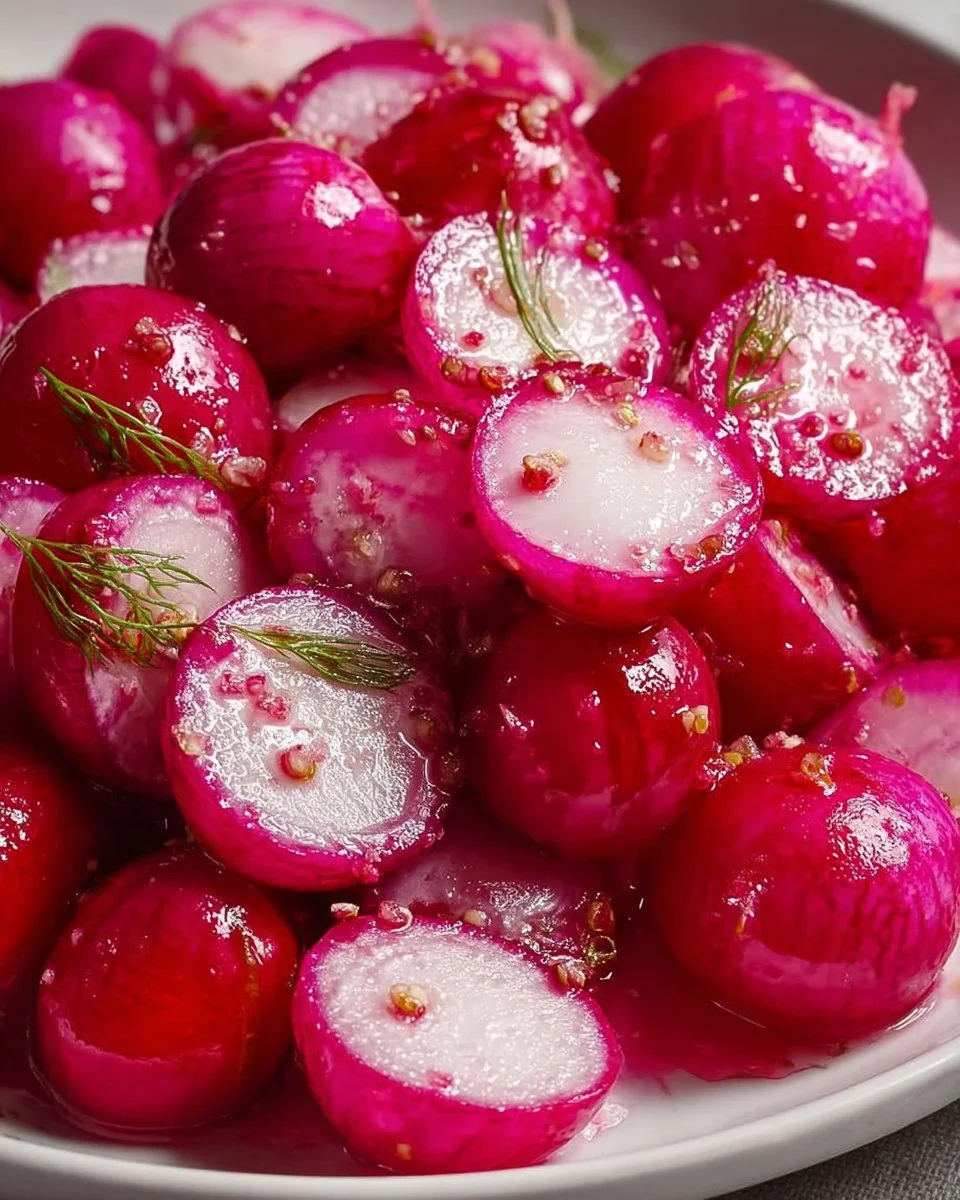
Imagine a bright, crunch-filled bite that dances on your palate, a vibrant burst of color and flavor that transforms the ordinary into the extraordinary. Pickled radishes bring an unexpected twist to your meals, turning simple salads into culinary masterpieces and elevating sandwiches from basic to beautifully balanced with their delightful crunch. As the tangy brine permeates the crisp texture of the radishes, these gems become an irresistible accompaniment—a symphony of sweet, sour, and spicy all wrapped up in one tantalizing bite.
The process of creating your own pickled radishes at home spreads warmth and excitement through the kitchen, filling the air with an intoxicating aroma of vinegar and spice. Each slice reveals the radiant pink hues that promise delightful flavor, coaxing you to take a bite. Your senses awaken as the cool, crisp radish meets the zesty punch of the pickling liquid, creating a contrast that is wholly satisfying. You find yourself drawn to the jar, eager to grab another delectable slice to pair with your next meal. These vibrant pickled radishes not only excite your taste buds but also spark conversation at the dining table.
Why You’ll Love This Pickled Radishes
These pickled radishes aren’t just a side dish; they are a versatile culinary companion that graces your plate with swirls of brightness. Offering a delicious interplay of flavors, they marry beautifully with rich, creamy dishes, adding a refreshing sharpness that enlivens every bite. They stand out for their ability to enhance a medley of occasions—from tasty picnics to sumptuous holiday spreads, and even casual weeknight dinners.
Moreover, the vibrant crunch of these pickles creates an unforgettable textural contrast that leaves you longing for more. Imagine layering them on tacos brimming with flavor or nestling them next to grilled fish, where they sing praises of freshness. When you craft your own batch of pickled radishes, you invite an explosion of flavor that simply cannot be replicated by store-bought versions. You control the sweetness, tanginess, and spice, making them perfectly suited to your unique palate.
Preparation Phase & Tools to Use
Diving into the wonderful world of pickling requires just a few essential tools, each playing a pivotal role in ensuring your radishes transform into bite-sized bursts of joy.
- Sharp Knife: A good knife makes slicing through the radishes a breeze, allowing for the flawlessly thin, uniform slices that pickle evenly.
- Cutting Board: Essential for a clean and safe workspace while preparing your radishes.
- Saucepan: This will hold your brine as it comes together, allowing the flavors to meld beautifully when heated.
- Glass Jar: A clean, airtight jar is necessary for storing your pickled radishes. It preserves the crunch and flavor, keeping the radishes crisp and refreshing.
- Measuring Cups and Spoons: Precision matters in pickling; measuring ingredients ensures that your brine achieves the perfect balance of flavors.
Preparation Tips:
- Use fresh radishes for the best crunch and flavor; avoid those that appear wilted or soft.
- Make sure your jar is sterilized to protect your pickles—this will help them last longer and enhance the flavors.
Ingredients for Pickled Radishes
Gather these simple yet powerful ingredients to create your pickled radishes:
- 1 bunch radishes: Any variety works, but look for bright, firm radishes for the best texture.
- 1 cup vinegar (white or apple cider): Offers the zingy foundation for the brine. Apple cider vinegar imparts a hint of sweetness.
- 1 cup water: Balances acidity, creating the perfect pickling liquid.
- 2 tablespoons sugar: Sweetness enhances the flavor of the radishes and offsets vinegar’s tartness.
- 1 teaspoon salt: Essential for both flavor and preserving the crunch of your radishes.
- 2 cloves garlic, sliced: Infuses the radishes with warm, aromatic notes.
- 1 teaspoon black peppercorns: Adds a subtle kick to the flavor profile.
- 1 bay leaf: Enhances the complexity of the brine with its earthy fragrance.
Feel free to play with these ingredients! Substituting the sugar with honey can introduce a delightful depth, while a splash of red pepper flakes can add an exciting layer of heat.
How to Make Pickled Radishes
Follow these clear, step-by-step instructions to fill your kitchen with the enticing aroma of homemade pickles:
- Clean and trim the radishes. Begin by washing the radishes thoroughly under cold water. Trim off the greens and the ends, which ensures a clean taste.
- Slice thinly. Use a sharp knife to cut the radishes into paper-thin slices. This enables even pickling and makes for delightful crunch.
- Combine the brine. In a saucepan, mix the vinegar, water, sugar, and salt. Bring this mixture to a rolling boil over medium heat, stirring until the sugar fully dissolves.
- Add the aromatics. Once bubbling, add the garlic, black peppercorns, and bay leaf to the brine, stirring gently. Allow this aromatic blend to infuse for a few moments.
- Cool the brine slightly. Remove the saucepan from heat and let the mixture cool for about 5 minutes. This step helps preserve the radish’s crunch.
- Jar the radishes. Place the sliced radishes in a clean glass jar, packing them tightly but not overly compressed. Carefully pour the warm brine over the radishes until they are fully submerged.
- Cool and seal. Allow the jar to cool to room temperature before sealing it. Refrigerate the jar after it’s cool to touch.
- Pickle time! For the best flavor, let your radishes pickle for at least 1 hour before indulging.
Tips:
- Taste the brine to gauge sweetness and acidity before pouring it over the radishes. Adjust sugar and vinegar to your preference.
Chef’s Notes & Helpful Tips
- Make-ahead tips: These pickled radishes taste even better after a day or two in the fridge, allowing the flavors to meld beautifully. Create a large batch ahead of time to enjoy throughout the week.
- Cooking alternatives: If you prefer not to use a stove, consider quick refrigerator pickling. Simply combine the brine ingredients in a jar and shake; let sit for a shorter time.
- Customization ideas: Spice it up with a bit of chili or riff on the flavors with ginger or turmeric. You can also play with vinegars for diverse flavor profiles.
Common Mistakes to Avoid
- Using stale or soft radishes: This leads to a disappointing texture. Select only the freshest radishes for perfect crunch.
- Not allowing the brine to cool: Pouring hot brine over the radishes can lead to limp pickles. Cool it slightly for the ideal crunch.
- Skipping sterilizing jars: Don’t skip this step! A sterile environment is key to preventing spoilage. Run jars through the dishwasher or boil them briefly.
What to Serve With Pickled Radishes
These pickled beauties mingle delightfully with a variety of dishes and elevate your meals in surprising ways. Consider these pairing ideas:
- Tacos: Their crisp texture pairs perfectly with meats, giving your tacos a bright, zesty kick.
- Sandwiches: Layer them on veggie or meat sandwiches for an added crunch and fantastic flavor punch.
- Salads: Toss them into green salads to enhance freshness and add a flavorful crunch.
- Rice bowls: Incorporate them into grain bowls for a vibrant accent against earthy grains.
- Charcuterie boards: Their vibrant color brings visual appeal and culinary intrigue to any spread.
- Poke bowls: They contrast beautifully with salmon and other rich elements, balancing each bite.
- Sushi: Add them as a zesty twist in fusion rolls, giving your sushi an unexpected kick.
Storage & Reheating Instructions
Store your pickled radishes in the refrigerator in their sterilized glass jar. They will keep well for about two to three weeks; their flavors continue to deepen over time, making them even more delightful. Reheating is unnecessary, as these pickles are enjoyed cold, bringing a refreshing element to any meal.
Estimated Nutrition Information
This recipe of pickled radishes offers a wholesome, low-calorie addition to your diet—approximately 10 calories per serving. However, variations in ingredient amounts can adjust these values, so remember that this is an approximation.
FAQs
What if I dislike a strong vinegar taste?
Consider using a milder vinegar or adjusting the ratio of water to vinegar for a subtler flavor. Apple cider vinegar usually offers a gentler sweetness.
Can I use other vegetables besides radishes?
Absolutely! Carrots, cucumbers, and even bell peppers make excellent pickled vegetables. Customize with whatever you have on hand for exciting variations.
How long does it take for pickled radishes to be ready to eat?
While you can eat them after just one hour, letting them sit for 1-2 days in the fridge builds depth in flavor and makes them even tastier!
Are pickled radishes healthy?
Yes! They provide antioxidants, vitamins, and make for a low-calorie, flavorful addition to many dishes. Plus, the probiotics from fermentation are good for gut health.
Can I can these pickled radishes for longer storage?
If you’re experienced with home canning, go ahead! However, ensure to follow proper canning guidelines to maintain safety and flavor.
Conclusion
As you take the plunge into making your own pickled radishes, you embark on a culinary adventure filled with flavor, color, and creativity. Imagine the smiles on your family’s faces as they relish the crunch, the tang, and the subtle spice in every bite. You create more than just a side dish; you craft an experience that transforms the ordinary into the extraordinary. So, gather your ingredients, roll up your sleeves, and let the wonderful world of pickling brighten your kitchen, one jar at a time!
Print
Pickled Radishes
- Prep Time: 15 minutes
- Cook Time: 10 minutes
- Total Time: 25 minutes
- Yield: 4 servings 1x
- Category: Condiment
- Method: Pickling
- Cuisine: Fusion
- Diet: Vegetarian
Description
Bright, crunchy pickled radishes that add a zesty twist to any meal.
Ingredients
- 1 bunch radishes
- 1 cup vinegar (white or apple cider)
- 1 cup water
- 2 tablespoons sugar
- 1 teaspoon salt
- 2 cloves garlic, sliced
- 1 teaspoon black peppercorns
- 1 bay leaf
Instructions
- Clean and trim the radishes, washing thoroughly and removing greens and ends.
- Slice thinly using a sharp knife for even pickling.
- Combine the brine ingredients in a saucepan: vinegar, water, sugar, and salt.
- Bring to a rolling boil over medium heat, stirring until sugar dissolves.
- Add garlic, black peppercorns, and bay leaf to the brine, stirring gently.
- Cool the brine slightly for about 5 minutes.
- Jar the radishes tightly in a clean glass jar.
- Pour warm brine over the radishes until submerged.
- Cool to room temperature before sealing, then refrigerate.
- Let the radishes pickle for at least 1 hour before serving.
Notes
For best flavor, allow pickled radishes to sit for 1-2 days in the fridge to develop depth.
Nutrition
- Serving Size: 1 serving
- Calories: 10
- Sugar: 2g
- Sodium: 200mg
- Fat: 0g
- Saturated Fat: 0g
- Unsaturated Fat: 0g
- Trans Fat: 0g
- Carbohydrates: 2g
- Fiber: 1g
- Protein: 0g
- Cholesterol: 0mg