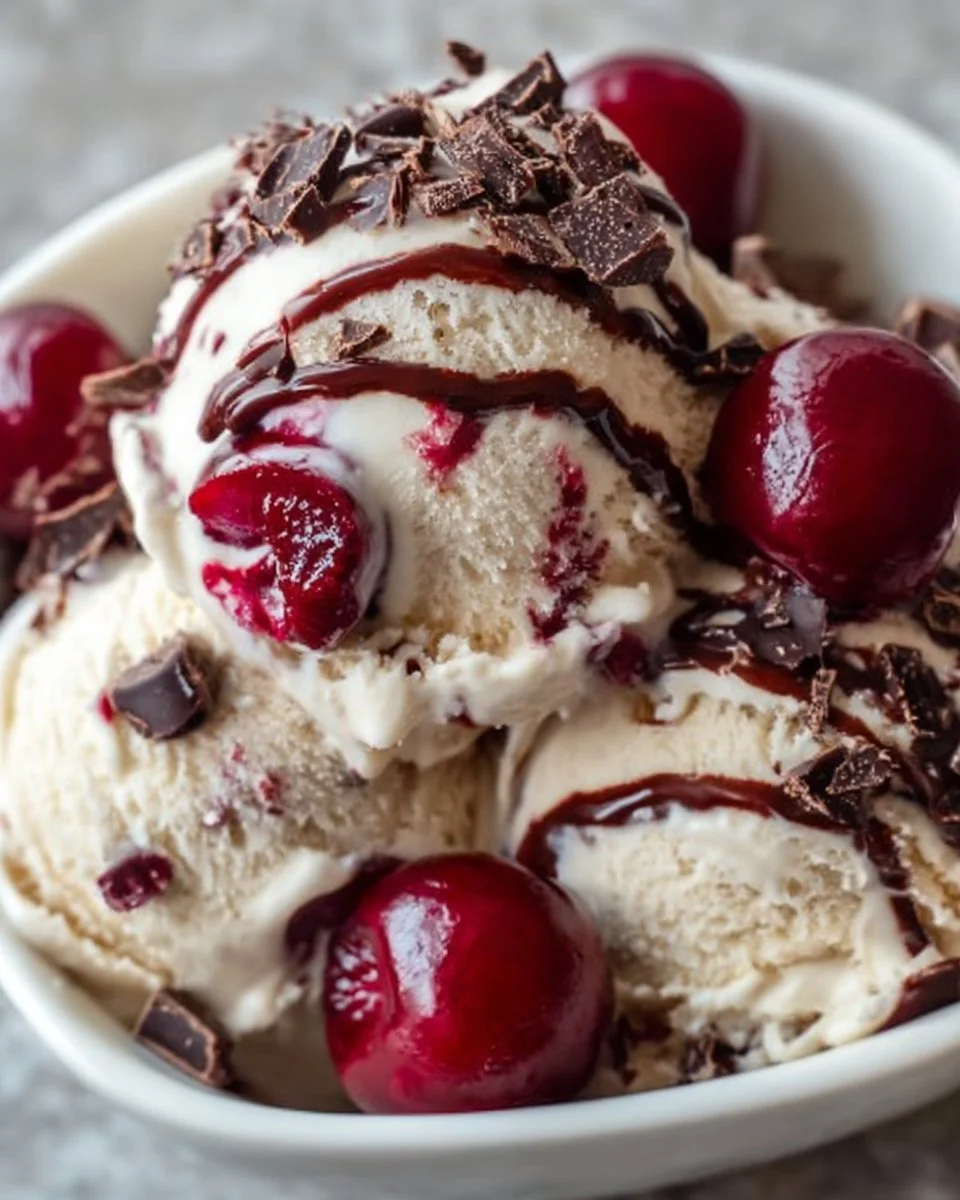
Imagine sitting on a sun-drenched porch, the warm breeze brushing against your skin, as you scoop onto your cone a luscious, creamy Cherry Garcia Ice Cream. Each spoonful delivers a delightful explosion of flavors, where sweet cherry bursts mingle with the rich, velvety chocolate chunks. This isn’t just an ice cream; it’s an experience—one that captures the heart and soul of summer, replete with memories of laughter and warmth. The ice cream dances on your palate, the smooth and creamy base perfectly complementing the juicy shards of cherries, while the dark chocolate adds just the right amount of decadence.
Every bite prompts an enticing aroma that wafts through the air, inviting friends and family to join in on this delightful treat. It transforms even the simplest of nights into something special, creates moments that linger long after the last spoonful disappears, and feels like a celebration of the flavors of life itself.
Why You’ll Love This Cherry Garcia Ice Cream
Cherry Garcia Ice Cream stands out because it perfectly blends the vibrancy of fresh cherries with the deep, rich notes of dark chocolate, creating a dessert that is both refreshing and indulgent. The creaminess coats your tongue, and each cherry delivers that satisfying pop of flavor, while the chocolate chunks provide a delightful contrast of texture. Imagine sharing a bowl of this ice cream on a warm evening, laughter in the air, or savoring a cone during a backyard barbecue.
This dish elevates every occasion: from impromptu gatherings to relaxing solo evenings with a good book. Plus, making Cherry Garcia Ice Cream at home allows you to enjoy a fresher, more personalized version of the beloved classic—free of preservatives, and bursting with your choice of cherries. Prepare this delightful ice cream ahead of time and have it ready for spontaneous festivities, or simply as a treat just for you. Each scoop is truly a taste of joy.
Preparation Phase & Tools to Use
Creating Cherry Garcia Ice Cream at home doesn’t require a complex setup, but having the right tools certainly enhances the experience. Here’s what you need:
- Mixing Bowl: A large mixing bowl makes whisking ingredients together easy and efficient. Opt for a sturdy glass or stainless steel bowl for the best results.
- Whisk or Electric Mixer: Whisking by hand builds your arm muscle, but an electric mixer saves time and ensures a beautifully blended base.
- Ice Cream Maker: This is an essential tool if you want that perfectly churned texture. It incorporates air while freezing, producing a light and creamy result.
- Spatula: A silicone spatula proves invaluable for folding in those luscious cherries and chocolate chunks without breaking them apart.
- Freezer-safe Container: Choose a container that seals well to keep your ice cream fresh and free from freezer flavors.
Preparation Tips: Always chill your mixing bowl and whisking tools beforehand to ensure that your ice cream mixture stays cold during the whisking process.
Ingredients for Cherry Garcia Ice Cream
Gather these key ingredients for your Cherry Garcia Ice Cream:
- 2 cups heavy cream: The star of the show, providing that unmatched creaminess and indulgent texture.
- 1 cup whole milk: Complements the heavy cream and adds a lighter touch.
- 3/4 cup granulated sugar: Sweetens the mixture without overpowering the cherries.
- 1 teaspoon vanilla extract: Enhances the overall flavor profile, making it more aromatic.
- 1 cup fresh or frozen cherries, pitted and halved: Their tart sweetness shines through and adds a burst of flavor in every bite.
- 1/2 cup dark chocolate chunks: Brings depth and richness; you can also use semi-sweet or milk chocolate if you prefer.
- 1 tablespoon cherry juice or syrup (optional): Adds an extra layer of cherry flavor—ideal if you want to intensify the taste.
Feel free to switch things up; use almond milk for a dairy-free option or try other fruits like strawberries for a fruity twist!
How to Make Cherry Garcia Ice Cream
-
Whisk the Base: In a mixing bowl, whisk together the heavy cream, whole milk, granulated sugar, and vanilla extract. Keep whisking until the sugar fully dissolves.
-
Churn: If using an ice cream maker, pour the mixture into your machine and churn it according to the manufacturer’s instructions. Usually, this takes about 20-25 minutes until the ice cream reaches a soft-serve texture.
-
Add the Goodies: About 5 minutes before the ice cream is done churning, add the halved cherries and dark chocolate chunks, allowing the machine to evenly distribute them.
-
No-Churn Method: If you’re taking the no-churn route, simply fold the cherries and chocolate into the base mixture after whisking, then transfer it to a freezer-safe container.
-
Freeze: For both methods, freeze the ice cream for at least 4 hours, or until it becomes solid.
-
Serve & Savor: Scoop generous portions into bowls or cones and enjoy the creamy, studded goodness that is Cherry Garcia Ice Cream!
Chef’s Notes & Helpful Tips
- Make Ahead: This ice cream stores beautifully in the freezer. Make it a day in advance, so you always have a creamy treat ready to go.
- Cooking Alternatives: While this recipe shines when churned, a no-churn version remains equally delightful and requires minimal effort.
- Customization Ideas: Feel free to swap in your favorite mix-ins—chopped nuts, crushed cookies, or a swirl of fudge could take this dessert to the next level.
Common Mistakes to Avoid
- Skipping the Churn: Avoid skipping the churning step if you want that perfectly airy texture—a common misconception is that simply freezing the mixture will suffice.
- Overloading with Mix-Ins: Balance is key! Too many mix-ins can lead to icy-not-creamy ice cream; stick to the measurements for the best result.
- Forgetting to Chill Equipment: Always chill your mixing tools and container beforehand. This simple step can enhance the creaminess of the final product.
What to Serve With Cherry Garcia Ice Cream
- Warm Brownies: The fudgy texture contrasts beautifully with the coolness of the ice cream.
- Chocolate Cake: Add a scoop for that heavenly contrast of flavors.
- Fresh Berries: Lightly sweetened berries elevate the flavor profiles.
- Pecan Pie: The rich, nutty flavors marry wonderfully with the ice cream.
- Chocolate Drizzle: A drizzle of warm chocolate sauce adds elegance and decadence.
- Waffle Cones: Crisp texture coupled with that smooth ice cream makes for an irresistible combination.
- Crushed Oreos: The crunch enhances the experience, and the chocolate flavor complements the cherries perfectly.
Storage & Reheating Instructions
Store your Cherry Garcia Ice Cream in an airtight container in the freezer for up to 2–3 weeks. Make sure to press a piece of parchment paper directly on the surface before sealing to prevent ice crystals from forming. While this ice cream requires no reheating, let it sit at room temperature for a few minutes before serving to soften it slightly for easier scooping.
Estimated Nutrition Information
Approximate values per serving (1/2 cup):
- Calories: 300
- Total Fat: 20g
- Saturated Fat: 10g
- Cholesterol: 70mg
- Carbohydrates: 30g
- Sugars: 25g
- Protein: 3g
*Please note these values are estimates and can vary based on specific ingredients used.
FAQs
1. Can I use frozen cherries?
Absolutely! Frozen cherries work just as well and can be a great option if fresh ones aren’t in season. Just be sure to thaw them slightly before adding them to your ice cream mixture.
2. Is there a dairy-free version?
Yes! Substitute heavy cream and whole milk with full-fat coconut milk or almond milk. The texture will vary slightly, but it will still be delicious.
3. How do I get a softer scoop?
To make your ice cream easier to scoop, let it sit at room temperature for about 5–10 minutes before serving.
4. Can I skip the chocolate?
Of course! Omit the chocolate chunks if you prefer, or substitute them with chopped nuts or even a swirl of caramel!
5. How long does it take to churn the ice cream?
Typically, it takes about 20–25 minutes to churn in an ice cream maker. However, keep an eye on the texture; once it reaches soft-serve consistency, it’s ready.
Conclusion
As the sun sets, casting a golden hue across the sky, savoring a bowl of homemade Cherry Garcia Ice Cream feels like a gentle embrace of nostalgia, warmth, and pure delight. This delicious dessert not only serves as a cool respite from the heat but creates cherished moments to last a lifetime. Dive into this creamy, fruity concoction, and let every scoop whisk you away to summer evenings filled with laughter and joy. You deserve this wholesome indulgence—grab your spoon and dive in!
Print
Cherry Garcia Ice Cream
- Prep Time: 15 minutes
- Cook Time: 25 minutes
- Total Time: 240 minutes
- Yield: 6 servings 1x
- Category: Dessert
- Method: Churning
- Cuisine: American
- Diet: Vegetarian
Description
A luscious, creamy ice cream combining fresh cherries and rich dark chocolate chunks, perfect for summer indulgence.
Ingredients
- 2 cups heavy cream
- 1 cup whole milk
- 3/4 cup granulated sugar
- 1 teaspoon vanilla extract
- 1 cup fresh or frozen cherries, pitted and halved
- 1/2 cup dark chocolate chunks
- 1 tablespoon cherry juice or syrup (optional)
Instructions
- Whisk the heavy cream, whole milk, granulated sugar, and vanilla extract in a mixing bowl until the sugar fully dissolves.
- Churn the mixture in an ice cream maker according to the manufacturer’s instructions for 20-25 minutes until it reaches a soft-serve texture.
- Add the halved cherries and dark chocolate chunks about 5 minutes before the churning is complete.
- Fold the cherries and chocolate into the base mixture if using the no-churn method, then transfer to a freezer-safe container.
- Freeze the ice cream for at least 4 hours, or until solid.
- Serve scoops into bowls or cones and enjoy!
Notes
Make ahead and store for up to 2-3 weeks in an airtight container. Let sit at room temperature for easier scooping.
Nutrition
- Serving Size: 1/2 cup
- Calories: 300
- Sugar: 25g
- Sodium: 100mg
- Fat: 20g
- Saturated Fat: 10g
- Unsaturated Fat: 8g
- Trans Fat: 0g
- Carbohydrates: 30g
- Fiber: 1g
- Protein: 3g
- Cholesterol: 70mg