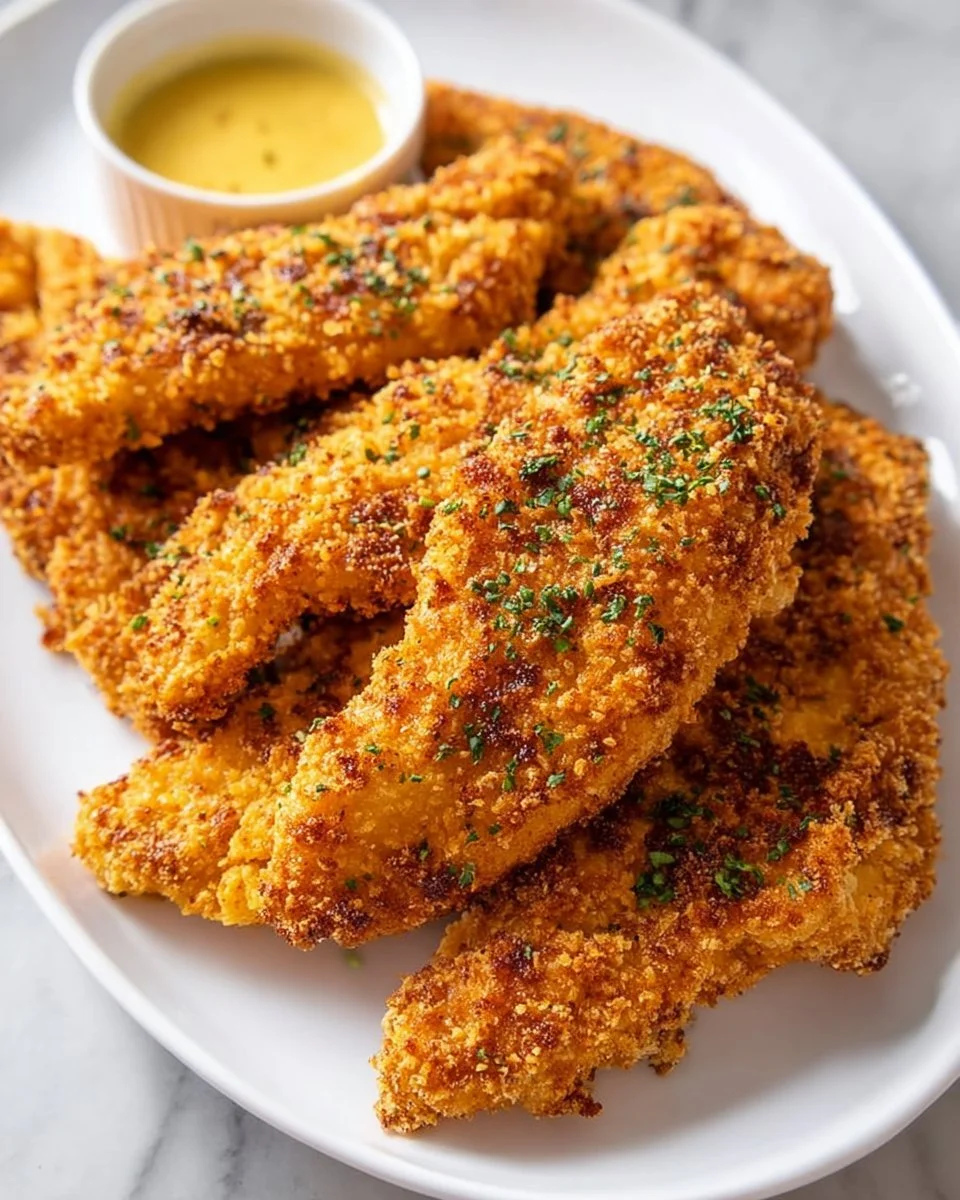
The tantalizing aroma of crispy baked chicken tenders wafts through the kitchen, enveloping you like a warm hug on a cool day. Each tender slice promises a delightful crunch that gives way to tender, juicy meat, making every bite an irresistible experience. Picture the golden, crispy coating glistening under the warm kitchen light, hinting at the flavor explosion waiting to happen. As you lean in closer, the rich scent of garlic and paprika awakens your senses, stirring up memories of family gatherings and cozy dinner nights. In an age where convenience often overshadows quality, these baked chicken tenders emerge as a glorious reminder of comfort food at its finest.
Ideal for feeding the family on a busy weeknight or impressing friends during a casual get-together, these chicken tenders offer both convenience and a touch of elegance. With minimal effort, you create a dish that feels indulgent yet wholesome. Imagine serving a platter of these golden delights, each one beckoning for a dip in your favorite sauce. The sheer satisfaction of crafting something so delicious from your own kitchen brings a grin to your face. Trust me, once you take that first bite, you’ll be transported to a world of flavor where every piece is a celebration. Let’s embark on this culinary journey and bring these baked chicken tenders to life!
Why You’ll Love This Baked Chicken Tenders
When it comes to home-cooked meals, few dishes can compete with baked chicken tenders in terms of flavor and versatility. These tenders hit all the right notes – crispy, savory, and oh-so-comforting. What truly sets them apart is the balance of flavors, where each bite marries the earthy notes of garlic and paprika with the juicy tenderness of perfectly baked chicken. The crunch of the coating creates a satisfying contrast to the tender meat, making this dish as much about texture as it is about taste.
These chicken tenders shine in various settings. They’re an easy weeknight dinner that can be whipped up in no time flat, and they also make for an impressive party snack or entrée. Serve them alongside zesty dipping sauces, and you have a dish that pleases palates of all ages. Plus, they lend themselves beautifully to customization. Feel free to experiment with spices, sauces, or even coatings to make them your own. Enjoy them with a side of fresh veggies, fries, or a crisp salad, and you’ve got a complete meal that’s bound to become a favorite!
Preparation Phase & Tools to Use
Creating the perfect baked chicken tenders requires just a few essential tools to help you along the way:
-
Baking Sheet: Ensure your baking sheet is large enough to accommodate all your tenders without crowding. A crowded pan leads to uneven cooking, so you want to give each tender enough space to develop that perfect crispy crust.
-
Parchment Paper: Lining your baking sheet with parchment paper not only prevents sticking but also helps achieve that golden crisp you crave without the hassle of a messy cleanup afterward.
-
Three Bowls: Setting up a breading station with three separate bowls allows for easy assembly line action. One holds your flour mixture, another for the beaten eggs, and a third for the breadcrumbs.
Preparation tip: Before you start, gather all your ingredients and tools, so you create a seamless cooking experience. Having everything ready makes your efforts feel effortless and oh-so-enjoyable.
Ingredients for Baked Chicken Tenders
To whip up your golden, crispy chicken tenders, gather these ingredients:
-
1 pound chicken tenders: The star of the show! Feel free to use chicken breast cut into strips if tenders are unavailable.
-
1 cup breadcrumbs: For the perfect crunch. Try using panko breadcrumbs for an extra crispy finish or seasoned breadcrumbs to add a burst of flavor.
-
1/2 cup flour: This forms the base layer of coating, giving the chicken something to cling to while ensuring it gets that delightful first crunch.
-
2 eggs: Beaten and ready to act as the glue that holds everything together.
-
1 teaspoon garlic powder: A must-have for that savory depth of flavor, adding warmth and richness.
-
1 teaspoon paprika: This lends a subtle smokiness and vibrant color to your tenders. Smoky or sweet varieties can work, depending on your taste preference.
-
Salt and pepper to taste: Simple yet essential, don’t skip these seasonings. They enhance all the other flavors beautifully.
-
Cooking spray: A light mist provides that extra touch of crispiness, ensuring each tender comes out of the oven beautifully golden.
How to Make Baked Chicken Tenders
Creating these mouthwatering baked chicken tenders is remarkably simple. Follow these steps for crispy perfection:
-
Preheat your oven to 400°F (200°C), ensuring it’s hot enough for that sought-after golden crunch.
-
Set up your breading station: In the first bowl, mix flour with salt, pepper, garlic powder, and paprika. In the second bowl, beat the eggs. In the last bowl, place the breadcrumbs ready for coating.
-
Begin the assembly line by coating each chicken tender in the flour mixture. Shake off any excess, ensuring an even layer sticks to the tender’s surface.
-
Dip the coated tender into the egg mixture, allowing the excess to drip off before moving on to the next step.
-
Finally, roll the tender in the breadcrumbs, pressing gently to ensure each piece is well-coated.
-
Arrange the breaded tenders on a baking sheet lined with parchment paper, ensuring they have enough space between them.
-
Lightly spray the tops with cooking spray to encourage extra crispiness, a step that makes all the difference!
-
Bake in the preheated oven for about 20-25 minutes, or until the tenders are golden brown and cooked through. Use a meat thermometer to ensure they reach an internal temperature of 165°F (75°C).
-
Serve warm with your favorite dipping sauce – be it homemade honey mustard, BBQ, or even a zesty ranch dressing.
Chef’s Notes & Helpful Tips
-
Make-ahead tips: Prep your chicken tenders in advance! You can bread them up to a day ahead and keep them in the fridge, ready to bake when you are.
-
Cooking alternatives: If you have an air fryer, use it! Air frying offers a quicker cooking time and an even crispier texture – simply reduce the cooking time to 12-15 minutes at the same temperature.
-
Customization ideas: Feel free to spice things up! Add cayenne for heat, or switch up the coating with crushed crackers or corn flakes for a different flavor profile.
Common Mistakes to Avoid
Creating crispy, delicious baked chicken tenders is easy, but some pitfalls can derail your culinary adventure. Here’s how to avoid them:
-
Skipping the seasoning: Neglecting to add salt and pepper to your flour mixture can lead to bland tenders. Don’t skip this crucial step!
-
Overcrowding the baking sheet: If tenders are too close together, they’ll steam rather than bake, resulting in less crispy results. Give each piece space to breathe.
-
Not preheating the oven: Jumping straight to baking without preheating can affect the cooking time and final crispiness. Always preheat for the best outcome.
What to Serve With Baked Chicken Tenders
You can’t go wrong with delicious sides to complement your baked chicken tenders. Here are several delightful pairings to consider:
-
Crispy French fries: A classic pairing that never disappoints. The crunchiness of fries mirrors your chicken tenders and satisfies every craving.
-
Coleslaw: Refreshing, tangy, and light, coleslaw provides a perfect textural balance to the crispness of the chicken.
-
Fresh vegetable sticks: Carrot and celery sticks offer a nutritious crunch and pair beautifully with ranch or blue cheese dressing for a health-conscious addition.
-
Macaroni and cheese: Comfort food at its best, this creamy side brings indulgence next to the crispy chicken tenders.
-
Crisp salad: A simple arugula or mixed greens salad drizzled with vinaigrette lightens the meal beautifully.
-
Sweet potato fries or wedges: These add a slightly sweet note that perfectly contrasts the savory tenders.
-
Corn on the cob: Succulent, juicy corn is a summer favorite that pairs wonderfully with any chicken dish.
-
Creamy potato salad: Another classic side that brings comforting flavors into play.
Storage & Reheating Instructions
Storing your leftovers properly ensures you can relive the deliciousness of your baked chicken tenders. Keep them in an airtight container in the fridge for up to three days. For longer storage, freeze them in a zip-top bag for up to three months. Ensure they are completely cooled before freezing, as this prevents ice crystals from forming.
For reheating, place frozen tenders in a preheated oven at 375°F (190°C) until heated through (about 20-25 minutes). Alternatively, reheat refrigerated tenders in a hot pan on the stove for a few minutes on each side to bring back that crispy texture.
Estimated Nutrition Information
While the nutritional content can vary based on ingredients and portion sizes, here’s a rough estimate for one serving of baked chicken tenders (about three tenders):
- Calories: 200
- Protein: 24g
- Carbohydrates: 15g
- Fat: 7g
- Fiber: 1g
Please note this information is approximate and should be tailored based on specific ingredients used.
FAQs
1. Can I use chicken breast instead of tenders?
Absolutely! Chicken breasts cut into strips will work just as well. They may take a minute longer to cook through, so ensure they reach an internal temperature of 165°F (75°C) before serving.
2. How can I make these tenders spicier?
You can introduce heat by incorporating cayenne pepper or red pepper flakes into the breading mixture. Adjust quantities based on your spice preference for the perfect kick!
3. Can I prep these ahead of time?
Yes! Bread the tenders and cover them in the fridge for up to 24 hours before you plan to bake them. Just be sure to bring them to room temperature before baking for even cooking.
4. Are these tenders gluten-free?
To make these chicken tenders gluten-free, swap traditional breadcrumbs and flour for gluten-free alternatives. There are many great options available in stores nowadays.
5. What do I do with leftovers?
Store leftover tenders in the fridge for up to three days or freeze them for longer storage. Reheat in the oven or on the stovetop to retain that delightful crispiness.
Conclusion
Baked chicken tenders are your ticket to a satisfyingly delicious meal that can easily transition from casual dinners to family celebrations. With their crispy exteriors and juicy interiors, every bite evokes warmth and delight. The beauty of this dish lies in its adaptability, allowing you to customize flavors and pairings to match any occasion. So, why not gather your loved ones around the table and introduce them to this irresistible recipe? Allow the aroma of baked chicken tenders to fill your home, and enjoy the heartfelt satisfaction of home-cooked goodness – you won’t regret it!
Print
Crispy Baked Chicken Tenders
- Prep Time: 15 minutes
- Cook Time: 25 minutes
- Total Time: 40 minutes
- Yield: 4 servings 1x
- Category: Main Course
- Method: Baking
- Cuisine: American
- Diet: Gluten-free option available
Description
Deliciously crispy baked chicken tenders with a flavorful garlic and paprika coating, perfect for any occasion.
Ingredients
- 1 pound chicken tenders
- 1 cup breadcrumbs
- 1/2 cup flour
- 2 eggs
- 1 teaspoon garlic powder
- 1 teaspoon paprika
- Salt and pepper to taste
- Cooking spray
Instructions
- Preheat your oven to 400°F (200°C).
- Set up your breading station with three bowls: one with mixed flour, salt, pepper, garlic powder, and paprika; one with beaten eggs; one with breadcrumbs.
- Coat each chicken tender in the flour mixture, shaking off excess.
- Dip the coated tender into the egg, allowing excess to drip off.
- Roll the tender in breadcrumbs, pressing gently to ensure coverage.
- Arrange on a baking sheet lined with parchment paper, allowing space between each piece.
- Lightly spray tops with cooking spray for extra crispiness.
- Bake for 20-25 minutes until golden brown and cooked through, checking for internal temperature of 165°F (75°C).
- Serve warm with your favorite dipping sauce.
Notes
For a spicier kick, add cayenne pepper to the breading mix. You can also use an air fryer for a quicker cooking time.
Nutrition
- Serving Size: 3 tenders
- Calories: 200
- Sugar: 1g
- Sodium: 400mg
- Fat: 7g
- Saturated Fat: 1g
- Unsaturated Fat: 4g
- Trans Fat: 0g
- Carbohydrates: 15g
- Fiber: 1g
- Protein: 24g
- Cholesterol: 180mg