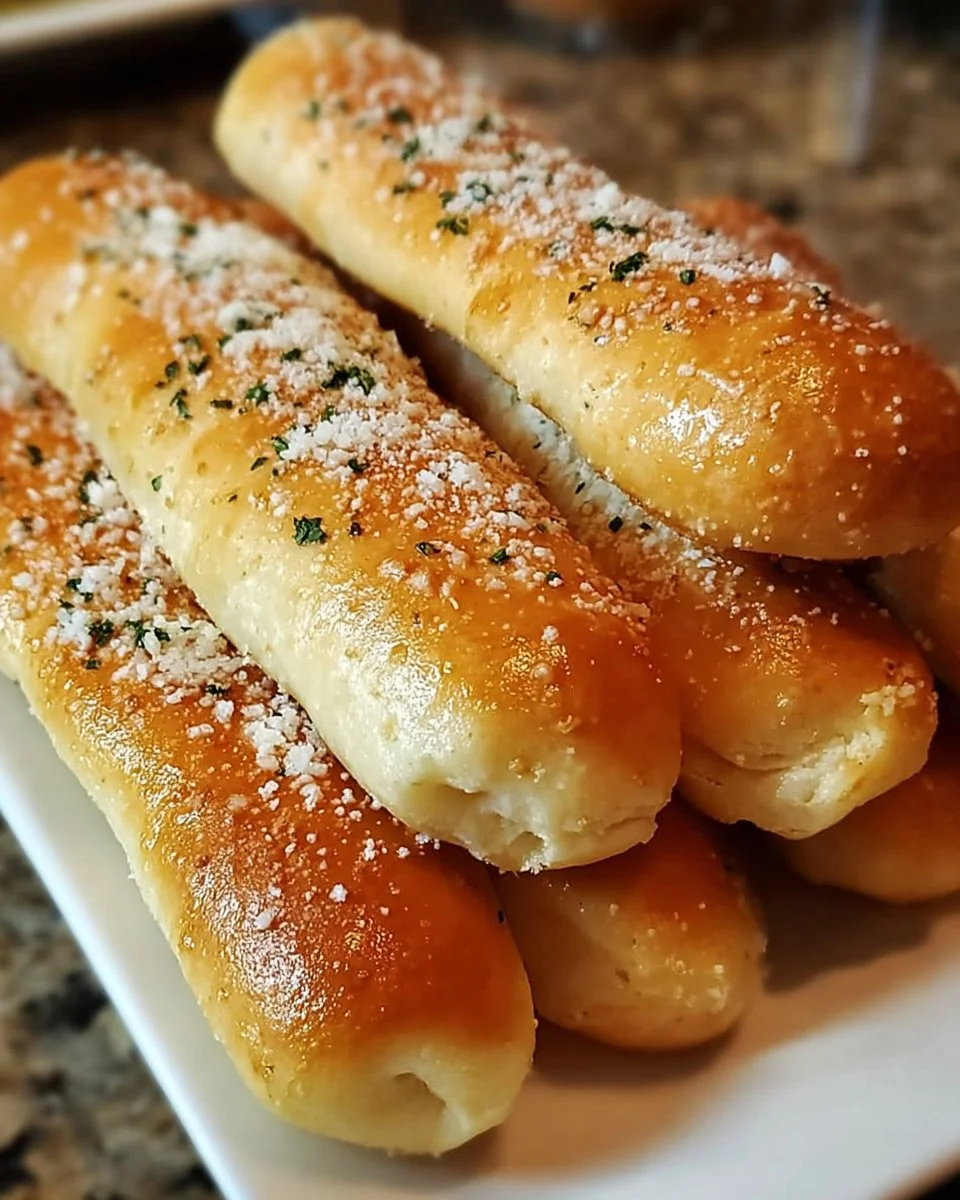
The warm aroma of freshly baked bread drifts through the air, wrapping around you like a soft embrace. Picture yourself stepping into a cozy Italian restaurant, the scent of garlic and herbs beckoning you closer. As you take your seat, a basket of Olive Garden breadsticks appears, golden and warm, inviting you to dive in. The first bite is a revelation; the exterior is delightfully crisp while the inside yields a soft, airy texture that melts in your mouth. Coated in a luscious garlic butter, these breadsticks don’t just fill your stomach—they stir your soul and bring a touch of Italy to your kitchen.
Creating your own Olive Garden breadsticks at home means reveling in the bliss of having them warm and fresh, right from your oven to your table. You can dip them into marinara sauce or enjoy them solo, experiencing the harmonious blend of flavors dancing on your palate. With each bite, you’ll find the warmth and comfort that only homemade bread can deliver, along with the satisfaction of having crafted something so genuinely delightful.
Why You’ll Love This Recipe
The allure of Olive Garden breadsticks extends beyond their exquisite taste; they offer a myriad of benefits that make them irresistible. First and foremost, they are incredibly versatile—perfect for any occasion, whether it’s a family dinner, a game night with friends, or a romantic evening in. Their rich flavor combined with that perfectly tender chew makes them suitable not just as an appetizer but as a star player on your dining table.
Picture these delectable morsels served alongside your favorite pasta, or even as a snack on their own. The slight hint of garlic, the creaminess from the melted butter, and the finish of grating Parmesan cheese make these breadsticks stand out. They beckon gatherings and celebrations, inviting laughter and warmth, and they effortlessly complement nearly any dish. Making them from scratch doesn’t just elevate your meal; it creates an experience that brings everyone together.
Preparation Phase & Tools to Use
To embark on this delightful baking adventure, having the right tools can make all the difference. Here’s what you’ll need:
-
Mixing Bowls: A large bowl for combining the dough and a smaller one for your yeast mixture. These help in proper mixing and ensure that everything comes together seamlessly.
-
Measuring Cups and Spoons: Accuracy is crucial in baking, so having reliable measuring tools guarantees the perfect balance of flavors.
-
A Wooden Spoon or Dough Scraper: Perfect for mixing and kneading, allowing dough to develop its unique texture without too much effort.
-
A Baking Sheet: This helps achieve that golden-brown crust we all know and love, essential for a breathtaking presentation.
-
Plastic Wrap or a Damp Cloth: Use this to cover your dough during the rising process, ensuring it stays warm and moist.
Before starting, gather all ingredients within reach. This makes the process fluid, keeping the excitement alive as you craft your delicious breadsticks. Don’t forget, quality ingredients set the stage for rich flavor, so choose premium butter and fresh yeast.
Ingredients for Olive Garden Breadsticks
-
2 1/4 teaspoons active dry yeast: This is the magic behind the bread’s delightful rise.
-
1 teaspoon sugar: A touch of sweetness that nourishes the yeast, enhancing flavor.
-
1 cup warm water: Activates the yeast and creates a perfect dough consistency.
-
2 1/2 to 3 cups all-purpose flour: Essential for structure; the dough’s texture depends on using the right amount.
-
1 teaspoon salt: Elevates flavors, crucial for that hearty taste.
-
1/4 cup unsalted butter, melted: Brings richness and moisture, allowing each bite to melt in your mouth.
-
1/4 teaspoon garlic powder: Instantly infuses the dough with a savory essence.
-
1/4 cup grated Parmesan cheese: Adds a nutty finish that takes the flavor to new heights.
-
Garlic butter (1/2 cup butter melted with 2 cloves minced garlic): This finishing touch envelops each breadstick in aromatic goodness.
Consider alternative ingredients based on your preferences; yogurt can substitute for butter for a tangy note, or whole wheat flour can infuse hearty texture, though it may change the overall flavor profile.
How to Make Olive Garden Breadsticks
-
Activate the yeast: In a small bowl, combine the yeast, sugar, and warm water. Allow it to sit for 5-10 minutes until it becomes frothy—a sign that your yeast is happy and ready to work.
-
Mix the dry ingredients: In a large mixing bowl, sift together 2 cups of flour and salt. This ensures even distribution, avoiding pockets of saltiness in your breadsticks.
-
Combine and stir: Pour the yeast mixture and melted butter into the flour mixture, stirring until everything combines. If the mixture feels too sticky, gradually add more flour until a soft dough forms.
-
Knead the dough: Turn the dough onto a floured surface and knead gently for about 5 minutes. You want a smooth texture that springs back when pressed.
-
Let it rise: Place the kneaded dough into a greased bowl. Cover it with plastic wrap or a damp cloth, and let it rise in a warm spot until it doubles in size, approximately 1 hour.
-
Preheat your oven: As the dough rises, preheat your oven to 400°F (200°C).
-
Shape your breadsticks: Roll out the dough on a floured surface and cut it into strips. Think of your desired size—the longer the strips, the more "classic" your breadsticks will feel. Place them on a baking sheet lined with parchment paper.
-
Second rise: Allow the shaped breadsticks to rise for another 30 minutes, giving them a chance to puff up beautifully.
-
Bake to perfection: Bake them in your preheated oven for 10-12 minutes, watching as they turn golden brown.
-
Add the finishing touch: While breadsticks bake, melt together your garlic butter. As soon as they emerge from the oven, brush them lavishly with the garlic butter and sprinkle generously with Parmesan cheese, allowing the warmth to infuse the flavors.
Chef’s Notes & Helpful Tips
-
Make-ahead tips: You can prepare the dough a day in advance. After the first rise, refrigerate it, and let it come to room temperature before shaping.
-
Cooking alternatives: If you prefer a quicker method, try using an air fryer at 350°F for about 6-8 minutes, keeping an eye out for that golden color.
-
Customization ideas: Want to spice things up? Incorporate fresh herbs into the dough for an aromatic twist or coat them with a sprinkle of Italian seasoning for herbaceous goodness.
Common Mistakes to Avoid
-
Not letting the dough rise enough: Failing to give your dough enough time can result in dense, chewy breadsticks rather than the light, airy version you desire.
-
Using water that’s too hot: Scalding water can kill the yeast. Aim for a comfortable warm temperature; it should feel pleasant to touch.
-
Unpredictable baking times: Not all ovens are calibrated the same. Keep an eye on your breadsticks; if they aren’t browning as expected, they may need a few extra minutes.
What to Serve With Olive Garden Breadsticks
Enhance your dining experience by pairing your breadsticks with a delightful array of dishes:
- Marinara Sauce: A classic match; each bite pairs perfectly with the tangy sweetness of marinara.
- Creamy Alfredo Pasta: Rich, creamy, and luscious, it creates a decadent duo with the soft texture of the breadsticks.
- Entrees: Pair with grilled chicken, shrimp scampi, or even a hearty lasagna for a satisfying meal.
- Salads: Serve alongside a fresh Caesar salad; the croutons and greens complement each other beautifully.
- Soups: Enjoy with a steaming bowl of sweet tomato basil soup for a heartwarming combination.
- Charcuterie Board: Include your breadsticks as an unconventional yet delightful addition—perfect for cheese spreads and cured meats.
Storage & Reheating Instructions
For any leftover breadsticks (if there are any!), store them in an airtight container at room temperature for up to 2 days. For longer storage, wrap them tightly in plastic wrap and freeze for up to 3 months. To reheat, simply pop them in a preheated oven at 350°F for about 5-7 minutes or until warm. Their aroma will wander through your home again, revitalizing the fresh-baked comfort.
Estimated Nutrition Information
This recipe offers approximately 80 calories, 3g of fat, 12g of carbohydrates, and 2g of protein per breadstick. Please note that actual values can vary depending on portion sizes and specific ingredients used.
FAQs
Q: Can I make these breadsticks without yeast?
A: While traditional breadsticks rely on yeast for rise and texture, you can craft a quick version using baking powder for a different texture. They won’t mimic the same delightful chew, but they can still be tasty.
Q: Are these breadsticks suitable for freezing?
A: Yes! Freeze them before baking for optimal freshness or freeze them after they’ve been baked. Just remember to reheat gently to revive their soft texture.
Q: What should I do if my dough doesn’t rise?
A: If your dough isn’t rising, check the yeast activity. It may be too old, or the water temperature used may have been too hot or too cold. Always test your yeast to ensure it’s alive before starting the recipe.
Q: Can I flavor the dough?
A: Absolutely! Feel free to incorporate herbs like rosemary, thyme, or even a sprinkle of red pepper flakes for an extra kick.
Q: How can I achieve a crunchier breadstick?
A: For a crispier finish, bake your breadsticks on a preheated baking stone or use an egg wash before baking. This will create a delightful golden crust.
Conclusion
The experience of savoring warm Olive Garden breadsticks transcends mere eating. It’s about sharing joy with family, creating warmth at the dinner table, and delighting your tastebuds with each buttery bite. By following this recipe, you can bring a piece of that beloved Italian atmosphere into your home, inviting comfort and happiness with every freshly baked batch. So roll up your sleeves and prepare to indulge in a culinary journey that beckons laughter and love—one breadstick at a time. Your kitchen awaits!
Print
Olive Garden Breadsticks
- Prep Time: 15 minutes
- Cook Time: 30 minutes
- Total Time: 45 minutes
- Yield: 12 servings 1x
- Category: Appetizer
- Method: Baking
- Cuisine: Italian
- Diet: Vegetarian
Description
Delicious homemade Olive Garden breadsticks with a golden crust and soft inside, perfect for dipping or enjoying on their own.
Ingredients
- 2 1/4 teaspoons active dry yeast
- 1 teaspoon sugar
- 1 cup warm water
- 2 1/2 to 3 cups all-purpose flour
- 1 teaspoon salt
- 1/4 cup unsalted butter, melted
- 1/4 teaspoon garlic powder
- 1/4 cup grated Parmesan cheese
- 1/2 cup garlic butter (1/2 cup butter melted with 2 cloves minced garlic)
Instructions
- Activate the yeast: In a small bowl, combine the yeast, sugar, and warm water. Allow it to sit for 5-10 minutes until frothy.
- Mix the dry ingredients: In a large bowl, sift together 2 cups of flour and salt.
- Combine and stir: Pour the yeast mixture and melted butter into the flour mixture, stirring until combined. Add more flour if sticky.
- Knead the dough: Turn the dough onto a floured surface and knead for about 5 minutes until smooth.
- Let it rise: Place the dough in a greased bowl, cover, and let it rise until doubled in size, about 1 hour.
- Preheat your oven: Preheat to 400°F (200°C).
- Shape your breadsticks: Roll out the dough on a floured surface and cut into strips.
- Second rise: Let the shaped breadsticks rise for another 30 minutes.
- Bake to perfection: Bake for 10-12 minutes until golden brown.
- Add the finishing touch: Brush hot breadsticks with garlic butter and sprinkle with Parmesan cheese.
Notes
You can prepare the dough a day in advance and store it in the refrigerator. For a quicker method, use an air fryer at 350°F for about 6-8 minutes.
Nutrition
- Serving Size: 1 breadstick
- Calories: 80
- Sugar: 1g
- Sodium: 200mg
- Fat: 3g
- Saturated Fat: 2g
- Unsaturated Fat: 1g
- Trans Fat: 0g
- Carbohydrates: 12g
- Fiber: 0g
- Protein: 2g
- Cholesterol: 10mg